Because you can manually fill them rather than relying on a water line, portable countertop ice makers are practical appliances.
Your portable ice maker should last for many years and be a huge asset to your home if maintained properly. How to clean countertop ice maker?
Cleaning your portable ice maker frequently is a crucial part of keeping it in good condition. If you are careless, mold or dangerous bacteria could develop inside your ice maker and cause you to become ill.
Continue reading to learn how to properly clean a countertop ice maker from our thorough research.
Read More: How to Clean Up A Frigidaire Ice Maker?
Table of Contents
Will Bacteria Grow in Ice Makers?
Over time, ice makers all get surprisingly dirty. It’s because it provides the ideal environment for the growth of mold and bacteria. Bacteria and viruses can survive in subfreezing conditions, which means they can get onto your ice.
Maintaining cleanliness is the best way to prevent bacteria and mold from growing on a portable ice maker.
How Often To Clean Countertop Ice Maker?
Every three to six months, you should clean a portable ice maker. The ice maker needs to be cleaned right away if you notice any of the following warning signs.
- Your ice has an odd odor.
- Your ice tastes odd or unusual.
- You visually see dirt on the ice maker interior walls
- The ice is smaller than usual or melts faster than it should
- It’s cloudy in appearance (If you have an ice maker that produces clear ice)
- Your ice maker isn’t working properly
Can You Clean A Portable Ice Maker With Vinegar?
Absolutely!
For cleaning your portable ice maker, vinegar is an excellent natural option. In addition to being natural, it also dissolves the lime and hard water that can make your ice maker break. To your ice maker or a spray bottle, simply add two cups of white vinegar for every cup of water. Black mold is among the 82% of mold species that vinegar will eradicate from porous and non-porous surfaces.
Vinegar is slower than other cleaning agents, which is a problem when trying to clean. Vinegar will work as a natural alternative if that is what you insist on doing. The above solutions will be effective if your ice maker is very dirty and requires additional care.
Steps To Clean A Countertop Ice Maker
I suggest you follow these easy instructions to help you clean your portable ice maker effectively.
1. Unplug Your Portable Ice Maker
You should turn off and unplug your portable ice maker before cleaning it.
It will be safer to move your unit close to a sink where you can start draining the reservoir after unplugging it to prevent damage.
2. Using The Drain Plug On The Side Or Underneath The Ice Maker, Empty The Reservoir Of Water.
Draining the remaining water is necessary before you start cleaning your portable ice maker.
You’ll see a small plug on the side or the bottom.
It’s a tiny screw cap with a tiny plastic plug inside the drain hole on my portable ice maker.
Bring the location where the water can drain into a sink, bowl, or bucket before using your portable ice maker. Drain the water reservoir completely by removing the drain plug.
A few minutes may be needed to completely drain the water from your unit.
3. Use A Cleaning Solution To Wash Your Portable Ice Maker
Reinstall the portable ice maker’s drain plug.
Combine water and a cleaning agent.
I use the Essential Values Ice Machine Cleaner in this tutorial. According to the label, add 1/4 of the bottle—40 ounces, or about 120 milliliters—to a gallon of water.
Use a one-gallon container and put 1/4 (40 oz or 120 mL) of the solution in it. Mix everything together, then pour the water and mixture into the water reservoir (you’ll probably need to remove the ice basket to fill it with water, then replace it inside the appliance).
A bonus tip is to fill a spray bottle with water and the cleaning solution for those challenging-to-reach places.
Reconnect the power to your portable ice maker now.
Restart the ice cycle by re-turning on your ice maker.
This process will take some time. Place the ice that your ice maker produces in the sink as it melts.
The more times you let the ice maker cycle through the ice-making process, the cleaner your appliance will be after each cycle.
Make sure there is still water and cleaning solution in the reservoir so you can later clean the ice maker. The water reservoir was half full (or empty, depending on your point of view) when I finished the ice cycle. For about 40 minutes, the ice cycle ran.
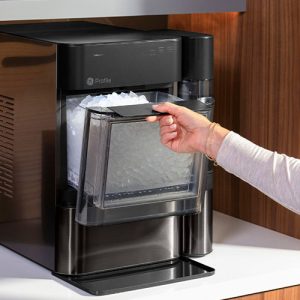
4. Take Out The Storage Container And Set It To The Side.
From inside the ice maker, remove the ice basket. You can set it aside while we finish cleaning the unit.
It’s a good idea to wash the ice basket with soap and warm water while it’s still attached to the ice maker. It needs to be thoroughly washed because, as you’ll see, it’s quite dirty.
Your sink can be filled with warm water, then left to soak for a while. Keep in mind that throughout the day, your ice basket will be in contact with it. Make sure the ice basket is clean because that is where your ice travels from the storage container to your mouth.
While you clean the rest of the unit, you can let your storage basket soak.
After the storage container has finished soaking, thoroughly clean, rinse, and dry it.
5. Scrub Down The Portable Ice Maker
The ice maker should then be unplugged and turned off. I know, again!
It’s time to perform a more thorough cleaning, so the storage bin needs to be taken out and the entire unit cleaned.
Apply cloth to the entire ice maker and clean it off with the cleaning solution that is still in the water reservoir.
Reaching areas that are inaccessible with a cloth is essential for a thorough cleaning. There are two different ways we can accomplish this.
I began by thoroughly cleaning the ice maker with a spray bottle.
I use a tiny brush to reach those incredibly difficult-to-reach places. Both the spray bottle and the brush I use are available for purchase on Amazon here.
Your ice maker should be completely clean after completing these steps. The difference should even be detectable through smell.
6. Drain The Water
Drain the ice maker’s water once more before proceeding with this step. Remove the drain plug as directed above, and then pour the water into a sink or bucket.
Depending on the amount of water in your reservoir, this could take a while.
7. Rinse Your Portable Ice Maker
Fill the ice maker’s water reservoir with fresh water while removing the drain plug, then allow the water to drain into a sink or bucket.
I can wash the ice maker in my kitchen with the removable tap that is there.
To reach the areas that are out of your reach, use a spray bottle filled with fresh water.
this process several times. Rinse thoroughly, then rinse once more.
Do not skip this step, or your ice will taste like the cleaning solution used to clean the unit. After washing, give your portable ice maker a thorough rinse.
Dry the ice maker’s interior next. You’ll see that there are little bits of debris that find their way to the reservoir’s bottom.
Do your best to dry the ice maker after removing all of those pieces from the bottom.
You can now reinstall the ice maker’s drain plug.
8. Make Ice Again And Throw It All Away
It’s almost finished, just make some more ice and throw it in the sink to make sure all of the cleaning solutions is gone.
Reconnect the ice maker.
Run the ice cycle at this time.
Please empty the entire bag of ice into your sink rather than using it. You can taste the ice to make sure there is no taste of soap or cleaning solution after several ice cycles.
You’re finished if the ice tastes great.
Once more, using the drain plug, remove the water from the ice maker. You can replace the drain plug after the water has been drained and then fill the water reservoir with fresh water.
Don’t forget to wash the ice maker’s exterior. Typically, dirt that is present on the exterior will eventually find its way inside. An ice maker that is shiny also looks great in your kitchen.
If the portable ice maker is made of stainless steel, you may need a stainless steel cleaner. Because they are quick and simple to use, stainless steel wipes are my preferred method. I purchased some of these from Amazon.
Your ice maker is now clean, congrats.
How To Maintain Countertop Ice Maker?
A regular maintenance schedule will prolong the life of your portable ice maker and guarantee that the ice you produce is of the highest caliber.
These straightforward procedures will help you maintain your portable ice maker.
If You’re Going To Be Gone For An Extended Period Of Time, It’s A Good Idea To Unplug Your Ice Maker.
Before going on vacation or putting it away for the winter, I would advise emptying all of the ice and water from your ice maker, wiping down the walls with a cloth, and allowing it to air dry.
What purpose does your ice maker serve by going through the ice cycle if you’re going to be gone for longer than a few days? It is preferable to turn it off, drain the water, dry it off, and store it.
Your Portable Ice Maker Should Always Be Kept Tidy.
Maintaining a clean ice maker is a further helpful suggestion for routine portable ice maker maintenance. Although cleaning your ice maker isn’t difficult, it does take time, as was already mentioned.
A damp rag should be used to clean it, and then you should let it air dry. Your ice maker will function properly and produce delicious ice if you keep it clean.
Ice makers can get surprisingly dirty over time, so it’s a good idea to wipe them down once a week with a damp cloth to keep them functioning as intended. Although wiping it down and rinsing it out should be done once a week, you may not always have the time to clean your ice maker as thoroughly as we mentioned above.
I advise changing the water in your reservoir every day to guarantee that your ice always tastes its best.
Wash Your Ice Storage Basket
To keep your ice tray clean and free of bacteria, take the time to wash it every day. Because that basket holds your ice all the time, you should be sure to give it a thorough wash with soap and warm water. Seriously, it takes five minutes.
Place the tray inside the sink with the warm water after adding some to the sink. Because the taste of harsh chemicals will be absorbed into the ice, you should be cautious when cleaning any component of your ice maker.
Don’t Use Any Cleaning Solution That Would Harm The Ice Maker
Make sure you don’t use anything to clean your ice maker that could harm it permanently.
It’s always good to use “ice maker-friendly” cleaners, and never use boiling water which will end up melting the plastic, which is the main construction of your ice maker.
The best method for cleaning your ice maker is to use a damp cloth and a mild detergent. Utilize the cleaning solutions we recommended above.
Regularly Descale Your Portable Ice Maker.
And finally, hard water is a major issue with an ice maker. Many times, calcium build-up inside an ice maker necessitates cleaning. Your ice maker may stop working if there is calcium buildup in the sensors.
There are two methods for solving this issue. You should buy a descaler from Amazon, in my opinion. See my TOP PICK for a portable ice maker cleaner in the section above; it works as both a cleaner and a descaler.
The second method involves mixing a teaspoon of vinegar with some warm water. This all-natural solution will dissolve the calcium and restore your ice maker to full functionality.
Benefits Of Countertop Ice Maker
If you’re looking for a new ice maker, you might be wondering what makes countertop models different from other ice makers. Here are some of the key benefits that they offer:
- They won’t occupy a lot of space on your countertop because they are relatively small and compact. This can be a significant benefit, particularly if your kitchen is small.
- Compared to integrated or freestanding ice makers, they are typically much less expensive. This is something to bear in mind if you’re on a tight budget.
- They are typically fairly simple to set up and operate. You shouldn’t have any trouble setting up most models because they come with straightforward instructions.
- Unlike built-in models, they don’t require any special installation. If you move or need to use it somewhere else, you can do so by taking it with you.
- By eliminating the need to fill trays or deal with the mess that comes with them, they provide a practical method for making ice.
In general, countertop ice makers have many wonderful advantages. One of these devices is worth thinking about if you’re looking for a simple and affordable way to make ice.
Factors To Consider In An Ice Maker
Here are a few more things to consider and queries to ask yourself when selecting an ice maker.
1. Storage Capacity
How much ice must you be able to hold in storage at once? The frequency with which you use the machine and the average number of guests you have over will determine this.
2. Daily Production
How much ice must the device be able to produce each day? Once again, your usage will determine this. A machine that can make a lot of ice is necessary if you frequently entertain or have a large family.
3. Size
On your countertop, how much room do you have for the machine? To avoid unpleasant surprises, make sure to measure before you buy.
4. Cost
Before you start shopping, establish a budget because ice machines can range greatly in price.
5. Maintenance
To learn what kind of maintenance the machine needs, make sure to carefully read the owner’s manual. Some models require less maintenance than others.
6. Warranty
Be sure to check this before you buy because the majority of ice makers come with some kind of warranty. If something goes wrong later, having this can help you sleep well.
Finding the ideal ice machine for your requirements can be ensured by taking into account all of these factors.
Conclusion
Both using and cleaning a portable countertop ice maker are simple. The value of sanitizing and cleaning the unit should be understood.
You can maintain your portable ice maker’s cleanliness and functionality in a few different ways, which are provided in this article.
Although maintaining your unit is not difficult, it does take time.
Cleaning your portable ice maker regularly will prolong the life of the device and enhance the taste of your ice.
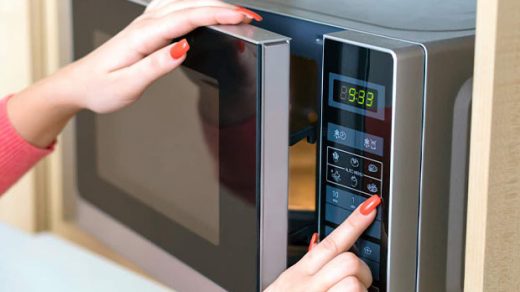
Read More: Best Way to Clean Microwave