As with most appliances, water heaters require regular maintenance, which is critical to the life of the water heater to maximize energy efficiency and extend the life of the device. A neglected water heater may keep the hot water flowing for years, but it will gradually cause your utility bill to climb, and eventually, it will fail altogether.
Although the heater manufacturer may provide specific instructions on how often the water heater should be filled, the rule of thumb is once a year.
In general, the purpose of a drainage water heater is to remove hard water and sediment that may accumulate during use. Of course, this buildup can pose a threat to the life and functionality of your water heater, so removing it by draining water from the water heater is a good maintenance technique and relatively simple.
Table of Contents
Why Do You Need to Drain Your Water Tank?
Hard water is a bit of a misnomer. This is not to say that water feels sharper when it flows through the faucet. To be exact, “hard water” refers to water containing certain minerals. Hard water exists almost everywhere, but the degree of hard water varies from region to region. Although many minerals are beneficial and even helpful for consumption, they may cause difficulties in your pipeline. Over time, these minerals accumulate in your water heater tank along with sediment from the city’s water supply. Imagine taking a bucket of water, filling it with water and a little sand, and pouring it out. If you don’t wash the bucket often, the sand will eventually fill it.
Should I Drain My Water Heater Periodically?
Regular flushing of lime and other sediments in the water tank of the water heater can improve the efficiency and service life of the water heater. In neglected water heaters, sediment can accumulate and calcify, making it difficult to remove. This can get so bad that the entire unit may need to be replaced. But if you flush the tank regularly, you can prevent sediment from causing problems.
All water has certain mineral content. If you live in a place with a lot of limestone underground, the groundwater will absorb calcium and magnesium deposits to form “hard water”. Hard water will produce sediment in the form of scale, which will settle out of the water and accumulate at the bottom of your water heater. Using a natural gas heater may lead to uneven heating of the tank and eventually to leakage. With electric heaters, fouling can burn out lower heating elements. In both cases, sediment buildup can clog the drain valve.
When Do You Drain Your Water Heater?
Experts usually recommend draining water at least once a year to remove sediment from the water heater. But if your water is very hard, you may want to rinse it more often. Flushing your water heater every few months may be necessary, depending on the mineral content of the local water supply. This helps ensure maximum hot water supply to your home and prevents deposits from corroding water heater components.
How Do You Drain Your Water Heater?
Step 1: Turn off your Re-circulation pump.
The pump simply helps recirculate the water in the closed water heater. Turning it off is as easy as unplugging it from the wall. Before proceeding to the next step, make sure you hear the sound of the water pump turning off.
Step 2: Turn Your Water Heater Off.
For gas water heaters, simply change your gas pipeline to its “pilot” setting. This will prevent the flame from starting when you are working on the water heater. If you use an electric water heater, please unplug it from the wall.
Step 3: Turn Off the Water Source of the Water Heater
Locate the cold water supply line to the water heater and set its input valve to the “off” position. This will prevent additional water from entering the water heater while you are draining the system.
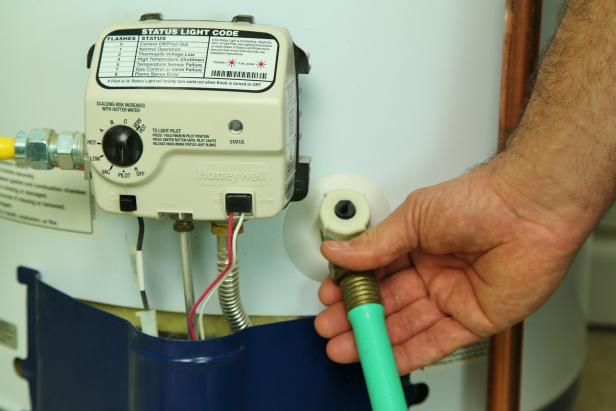
Step 4: Connect the Hose to the Drain Valve
Locate the drain valve at the bottom of the water heater tank and tighten the hose.
Step 5: Open the Drain Valve
Before opening the drain valve, make sure your house leads to a place where it can drain. I suggest using a large bucket so that you can clearly see the results of the water heater drainage.Use the valve bottle opener to open the valve, which should be located on the side of the valve at the bottom of the water tank.
Step 6: Let Air Enter the Jar
According to the structure of the water heater, there are two ways to introduce water into the water tank to start the drainage process. Some water heater tanks have pressure relief valves on the outside, allowing you to easily introduce air into the system.
If you do not have a pressure relief valve, introducing air is as simple as loosening a nut in the pipe that enters the top of the system.
Either way, you should hear the water being introduced into the system and the water will begin to drain.
Step 7: drain the water tan
The water supply tank has enough time to completely drain. If you use the bucket as recommended, this is a good time to monitor the water and make sure it is not too dirty. If the water changes color, it may mean that you should change the water heater.
Step 8: Close the Air Inlet
According to the method you used in step 6, it is time to shut down the system and prevent air from entering by closing the pressure relief valve or tightening the nut on the top of the water tank.
Step 9: Flush the Water Tank
Before demolishing your house, open the valve we closed in step 3. This will allow water to flow into the tank and any additional sediment to be discharged from the system. After a few minutes, it is not time to close the drain valve and disconnect the hose.
Step 10: Turn On the Hot
Before reconnecting the water pump, we disconnected it in step 1, turned on all the hot water faucets and fixtures in the home, and let them flush for a few minutes. After washing, you can plug in the water pump.
Finally, switch your fuel tank from “pilot” to “on”, or plug your electric fuel tank back into the wall.
What If Your Tank Won’t Drain?
If your tank drains slowly or not at all, try opening the temperature/pressure relief (TPR) valve on the hot water tank. This is located near the top of the hot water tank. It is usually a lever that you can lift or lower, and there is a pipe from it down to the bottom of the tank. Opening the TPR valve may open the potential vacuum in the water tank, thus preventing the discharge of water.
Or there may be too much sediment in your water tank blocking the drain valve.
Summary
Although the hot water tank is one of the most used electrical appliances in the home, it is also one of the most easily ignored electrical appliances. If you follow the above steps, it is easy to maintain your hot water tank.